VNC Remote Assistance
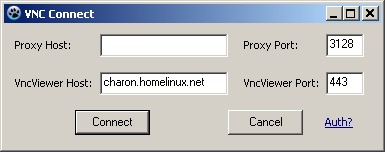
Are you the person everybody turns to when they have computer trouble? If the answer is yes, then this solution is for you. This is a zero-configuration solution. All that the person you are helping needs to do is to download an executable, run it, and click Connect. This solution also works with most HTTP proxy servers. It also automatically reads the Internet Explorer proxy settings, so ideally the person you are helping won't have to enter the proxy settings manually. It will not wait for new connections and it will not install itself as a service. You don't need to set up any passwords, but it does support proxy authentication just in case you need it (see the Auth? link on the bottom right).
Traditional VNC packages are good, but they have a few drawbacks. These packages need to be installed by the person needing help. They need to have an external IP address, and configure a password (and possibly port forwarding on their routers), or add a listening vnc viewer manually by typing in the address of the helper. Some packages also install themselves as an automatically starting windows service, which leaves them vulnerable because of possible misconfiguration. They also don't work over proxy servers. A similar solution to mine is UltraVNC SC. A disadvantage of SC is that it cannot connect over proxy servers, and it doesn't allow the user to modify the vnc viewer's address to connect to.
Download uncustomized
If you don't want to go trough all the trouble of customizing the executable to have your viewer's address as default, then you can get a version with an empty default setting here .
.
How to make your own
- First of all, unless you have a static ip address, it might be a good idea to register with a free Dynamic DNS service such as dyndns.org. Also setup your computer or router to automatically update the dns records.
- If you have a router or firewall, then configure port forwarding, or just the firewall settings so that you can receive incoming connections to a certain port number. It is up to you what port number you choose, but I recommend 443, which is the default port for HTTPS. This is a good idea, because well configured proxy servers usually block the connect method to ports different from 443.
- Download help.zip and extract it.
- Download and install Lazarus.
- Download and install the Nullsoft Scriptable Install System (NSIS).
- Download and install ResHacker.
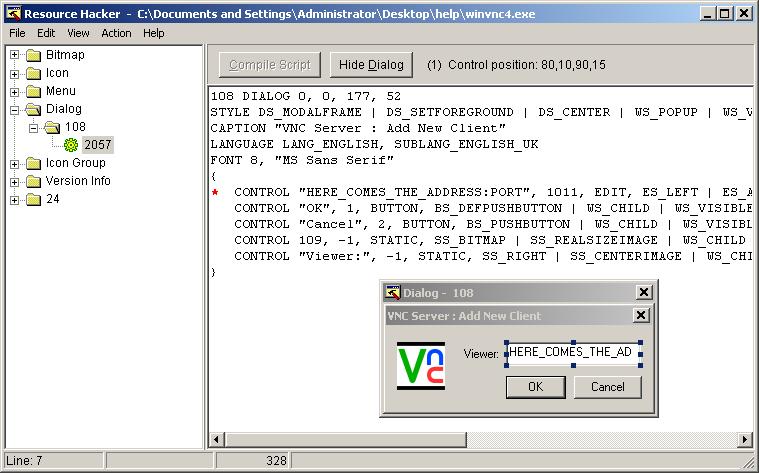
- Open winvnc4.exe with ResHacker, go to dialog, and find the Add New Client dialog. Modify the "EDIT" control to include the address:port of the machine where you are running the vnc viewer. (See here). Click "Compile Script", and the File > Save. This is useful if you get disconnected, and want to reconnect without restarting the application. Also if you are using a pristine winvnc4.exe, not the one provided by me, then you might want to remove some of the unneeded menu items.
- Replace vnc.ico with wathever icon you want your final executable to have.
- Open vncconn.lpi using Lazarus. If you can't see the form then go to View > Forms, and select "connf". Edit the "Text" property of the VncViewer Host(vhost), and Port(vport) text boxes. (When you select them the Object inspector should appear showing all of their properties). Click Run > Build.
- After the executable was successfully built, quit Lazarus, and rename vncconn.exe into helpc.exe
- Right-click on exe.nsi and select "Compile NSIS Script (Choose Compressor)". Select LZMA (Solid).
- You are finished! The output file is called helpp.exe.
Notes
- This solution is using proxytunnel: http://proxytunnel.sourceforge.net/
- I am also using the free (GPL) version of RealVNC: http://www.realvnc.com/
- This also works with Vista and Windows 7, but when the UAC comes up the viewer is disconnected. I read somewhere on a forum that SC does not have this limitation, but I have not tested it yet to be sure.
- What the lazarus project basically does is that is collects the connection information (or just waits for the user to hit Connect). If the user doesn't have a proxy then the vnc server is started, and after a small delay a connect command is sent to it by rerunning the winvnc executable with different arguments. If a proxy is in use then proxytunnel is started too, listening on the local port 5678. The vnc server then gets a connect command to connect to this port. When the vnc server process ends, then the proxytunnel process is killed too.
- To modify VNC settings see the .CommandLine := assignments in the .pas source file
- NSIS is used only as a self extracting executable that also runs its contents and deletes them after they are finished.
- An older, much smaller version that just uses a batch file, and doesn't ask the user anything (also doesn't work with proxies),
can be found here .